Posts

Getting Started with ESP32 using Arduino IDE - Blink LED

Image
The ESP32 is a popular microcontroller platform for Internet of Things (IoT) applications. It offers a wide range of capabilities and can be used for a variety of projects. The Arduino IDE is one of the most popular development environments for the ESP32, as it provides an easy-to-use interface and powerful libraries. In this article, we will explore how to get started with the ESP32 using the Arduino IDE and blink an LED. Setting up the Arduino IDE Before we begin, we need to set up the Arduino IDE to work with the ESP32. First, download and install the latest version of the Arduino IDE from the official website. Then, open the IDE and go to the Preferences menu. In the Additional Boards Manager URLs field, add the following URL: https://dl.espressif.com/dl/package_esp32_index.json . This will allow the Arduino IDE to install the necessary libraries and board definitions for the ESP32. Next, go to the Boards Manager in the Tools menu and search for "esp32". Select the ESP32 ...
Image
Random Access Memory, commonly known as RAM, is a crucial component in modern digital systems. It allows for the temporary storage and retrieval of data in electronic devices. Designing RAM in VHDL (VHSIC Hardware Description Language) is a crucial skill for any digital design engineer, and in this article, we will discuss how to design RAM in VHDL using ModelSim, a popular simulation tool. If you are beginner in VLSI and VHDL, you should go with this article: Getting Started with VLSI and VHDL using ModelSim – A Beginners Guide Before we dive into designing RAM, let us first understand what it is and how it works. RAM is a type of memory that allows for data to be stored and retrieved in any order, hence the term 'random access.' RAM is made up of a series of storage locations, each of which can store a single bit of data. These storage locations are organized into words, with each word containing a fixed number of bits. The size of the RAM is determined by the number of words...

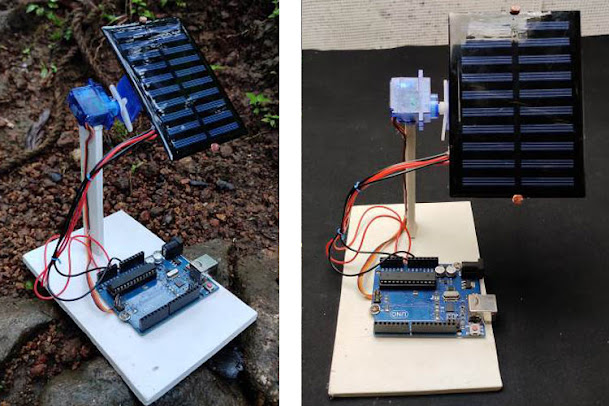
Building Own Sun-Tracking Solar Panel Using Arduino

Image
If you're interested in harnessing solar energy to power your home, you might be considering installing solar panels on your roof. However, to get the most out of your panels, you need to ensure that they are pointed directly at the sun throughout the day. This can be accomplished by building a sun-tracking system that automatically adjusts the position of your solar panel based on the movement of the sun.  Project Inspiration : Building your own Sun Tracking Solar Panel using an Arduino In this article, we'll show you how to build a sun-tracking system using an Arduino microcontroller. With this system, your solar panel will always be pointed directly at the sun, maximizing its energy output. The first step in building your sun-tracking system is to gather the necessary components. You'll need an Arduino board, a servo motor, a light sensor, and a few other components that can be easily obtained from an electronics supplier. Once you have your components, you can begin ass...

How DHT22 Temperature and Humidity Sensor Module can be used for Temperature Monitoring Projects?

Image
DHT22 is a temperature and humidity sensor module that can be used to monitor the temperature and humidity levels in various applications. The module consists of a capacitive humidity sensor and a thermistor to measure the temperature. The DHT22 module can be easily interfaced with a microcontroller such as Arduino or Raspberry Pi. The module has a digital output that provides the temperature and humidity readings in a digital format. The data can be accessed using a simple communication protocol, making it easy to use in temperature monitoring projects. One of the most common applications of the DHT22 sensor module is in home automation projects. The module can be used to monitor the temperature and humidity levels inside a room and adjust the temperature and humidity levels accordingly. This can help improve the indoor air quality and create a comfortable living environment. The DHT22 module can also be used in industrial applications such as greenhouses and food storage facilities....

How to Build an IoT-based Fan Speed Controller?

Image
The Internet of Things (IoT) is changing the way we interact with our world, from our homes to our workplaces. One of the most significant impacts of the IoT has been in the area of home automation. With IoT-based devices, you can control and monitor your home's appliances from anywhere in the world, making your life more comfortable and convenient. In this article, we will look at how to build an IoT-based fan speed controller. This project is inspired from  IoT Based Smart Fan Control using ESP8266 and Blynk , you can check out before moving ahead. What is IoT-based Fan Speed Controller? An IoT-based fan speed controller is a device that allows you to control the speed of your fan using a mobile application or a web interface. The device consists of a microcontroller, a motor driver, and a Wi-Fi module. The microcontroller is responsible for receiving commands from the user and sending the corresponding signals to the motor driver, which controls the fan's speed. How to Build...

Driver Drowsiness Detection & Alerting System using Arduino

Image
Road accidents became a matter of concern due to the huge increase in traffic. The primary cause of accidents is due to the drowsiness of drivers in the nighttime. Fatigue and drowsiness are some of the leading causes of major accidents on Highways. The only solution to this problem is detecting the drowsiness and alerting the driver. So, in this project, we have thought of building a Driver Drowsiness Detection and Alerting System for Drivers using Arduino Nano, Eye blink Sensor, and RF Transceiver module. The basic purpose of this system is to track the driver’s eye movements using Eye blink Sensor and if the driver is feeling drowsy, then the system will trigger a warning message using a loud buzzer alert. Materials Required for Building a Drowsiness DetectorArduino Nano Eyeblink Sensor RF Transceiver Module HD12E & HD12D IC Buzzer 9V Battery 12V DC power supply Driver Drowsiness Detector Circuit Diagram Driver Drowsiness Detector consists of RF Transmitter and Receiver section....
Image
 How to use DRV8833 Dual Motor Driver Module with Arduino? The DRV8833 dual motor driver module is a useful device for controlling the speed and direction of two DC motors with an Arduino microcontroller. This module is a small but powerful device that can drive motors with up to 1.2A current per channel. It can also operate at a wide range of voltages, making it ideal for a wide range of applications. In this article, we will discuss how to use the DRV8833 dual motor driver module with an Arduino. Hardware setup  The DRV8833 dual motor driver module can be connected to the Arduino using the following pin connections: IN1 pin of the DRV8833 module to digital pin 9 of the Arduino IN2 pin of the DRV8833 module to digital pin 10 of the Arduino IN3 pin of the DRV8833 module to digital pin 11 of the Arduino IN4 pin of the DRV8833 module to digital pin 12 of the Arduino GND pin of the DRV8833 module to GND pin of the Arduino VCC pin of the DRV8833 module to 5V pin of the Arduin...