Posts

Showing posts with the label arduino projects for beginners

Introduction to Arduino Development Boards

Image
Arduino development boards are versatile and user-friendly platforms designed to facilitate the creation of interactive and innovative electronic projects. These boards are widely popular among hobbyists, students, and professionals due to their ease of use, flexibility, and extensive community support. Whether you're a beginner in electronics or an experienced maker, Arduino development boards offer a seamless entry into the world of embedded systems and programming.     Key Features and Components Arduino development boards come equipped with various features and components that make them ideal for a wide range of projects: Microcontroller: At the heart of every Arduino board is a microcontroller, typically from the Atmel AVR family. This microcontroller acts as the brain of the board, executing the code you write to control external components. Digital and Analog Pins: Arduino boards have multiple digital and analog input/output pins that allow you to connect various sens...
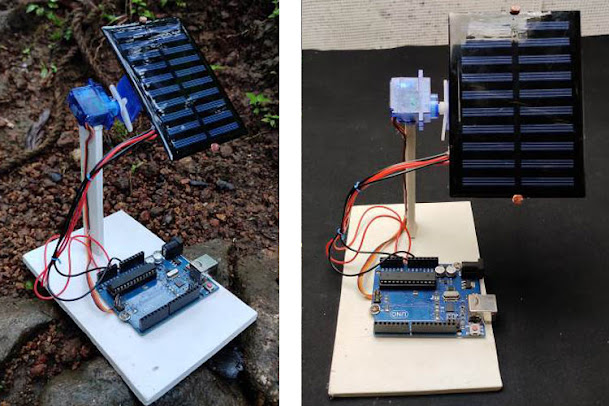
Building Own Sun-Tracking Solar Panel Using Arduino

Image
If you're interested in harnessing solar energy to power your home, you might be considering installing solar panels on your roof. However, to get the most out of your panels, you need to ensure that they are pointed directly at the sun throughout the day. This can be accomplished by building a sun-tracking system that automatically adjusts the position of your solar panel based on the movement of the sun.  Project Inspiration : Building your own Sun Tracking Solar Panel using an Arduino In this article, we'll show you how to build a sun-tracking system using an Arduino microcontroller. With this system, your solar panel will always be pointed directly at the sun, maximizing its energy output. The first step in building your sun-tracking system is to gather the necessary components. You'll need an Arduino board, a servo motor, a light sensor, and a few other components that can be easily obtained from an electronics supplier. Once you have your components, you can begin ass...

Driver Drowsiness Detection & Alerting System using Arduino

Image
Road accidents became a matter of concern due to the huge increase in traffic. The primary cause of accidents is due to the drowsiness of drivers in the nighttime. Fatigue and drowsiness are some of the leading causes of major accidents on Highways. The only solution to this problem is detecting the drowsiness and alerting the driver. So, in this project, we have thought of building a Driver Drowsiness Detection and Alerting System for Drivers using Arduino Nano, Eye blink Sensor, and RF Transceiver module. The basic purpose of this system is to track the driver’s eye movements using Eye blink Sensor and if the driver is feeling drowsy, then the system will trigger a warning message using a loud buzzer alert. Materials Required for Building a Drowsiness DetectorArduino Nano Eyeblink Sensor RF Transceiver Module HD12E & HD12D IC Buzzer 9V Battery 12V DC power supply Driver Drowsiness Detector Circuit Diagram Driver Drowsiness Detector consists of RF Transmitter and Receiver section....

Build your own Wireless Stethoscope with Arduino and HC-05 Bluetooth

Image
  Most heart diseases are associated with and reflected by the sound that the heart produces, and one of the easiest and cheapest ways of diagnosing cardiac dysfunction is by Heart auscultation i.e listening to the heart sound. Now if we are talking about traditional auscultation, that requires experience and good listening skills. That is why in this project we thought to build an electronic stethoscope that will be able to get the heart rate of the human body and we can display the data in a Bluetooth-based serial terminal window.  How Does Wireless Digital Stethoscope Work?  In order to get the heartbeat data, we will first get a stethoscope and cut it in half to fit a condenser microphone, so that we could get the heartbeat sound from the stethoscope. Next, we will make an amplifier with an op-amp and amplify the signal from the microphone so that we could read it with the ADC of the Arduino. But before reading the signal, we will pass it through a low pass filter tha...